文章目录
- 1.用户管理
- —1.1 作用
- —1.2 用户的定义方式
- —1.3 用户的管理
- 2.权限管理
- —2.1 作用
- —2.2 定义方式
- —2.3 权限的管理
- ——2.3.1 权限查询
- ——2.3.2 授权
- ——2.3.3 回收权限
- —2.4 开发及应用人员用户授权流程
- —2.5 mysql8.0在用户、权限管理方面的变化
- 3.MySQL连接管理
- —3.1 客户端命令
- ——3.1.1 Socket连接方式
- ——3.1.2 TCP/IP连接
- —3.2 开发工具
- 4.初始化配置文件
- —4.1 作用
- —4.2 文件格式
- ——4.2.1 语法
- ——4.2.2 配置文件的示例
- ——4.2.3 配置文件读取顺序
- —4.3 MySQL本地管理员用户密码忘记
- 5. mysql的启动关闭
- 6.多实例的应用
1.用户管理
—1.1 作用
Linux用户:登录系统、管理操作系统对象(文件)
MySQL用户:登录数据库、管理数据库对象(表)
—1.2 用户的定义方式
linux用户:useradd 用户名(字母、数字、特殊符号等组合)
MySQL用户:用户名@'白名单'

白名单:一个或者多个IP的列表,在列表中存在的IP才能连接数据库
白名单书写方式:
wordpress@'%'     所有地址
wordpress@'10.0.0.200' 只允许一个地址
wordpress@'db01' 允许db01别名操作
wordpress@'10.0.0.%'	10.0.0.0/24网段所有地址
wordpress@'localhost'  只能本地主机登陆
wordpress@'10.0.0.5%'  50~59
wordpress@'10.0.0.0/255.255.254.0' 23位掩码的网段
—1.3 用户的管理
查:
mysql> select user,host from mysql.user;
+---------------+-----------+
| user | host |
+---------------+-----------+
| mysql.session | localhost |
| mysql.sys | localhost |
| root | localhost |
+---------------+-----------+

mysql> desc mysql.user;查找记不住的命令

mysql> mysql> select user,authentication_string(密码),host,plugin(插件信息) from mysql.user;
+---------------+-------------------------------------------+-----------+-----------------------+
| user | authentication_string | host | plugin |
+---------------+-------------------------------------------+-----------+-----------------------+
| root | *23AE809DDACAF96AF0FD78ED04B6A265E05AA257 | localhost | mysql_native_password |


增:
需求:通过oldguo用户,密码123,通过10网段任一地址登陆
mysql> create user oldguo@'10.0.0.%' identified by '123';
改:
mysql> alter user oldguo@'10.0.0.%' identified by '456';
5.6中修改方法:
set password for test@'10.0.0.%' = PASSWORD('123');
删:
mysql> drop user oldguo@'10.0.0.%';
2.权限管理
—2.1 作用
控制用户能够对数据库对象做哪些操作
—2.2 定义方式
Linux权限:r w x
mysql权限:命令即权限

查看权限列表:
mysql> show privileages;
ERROR 1064 (42000): You have an error in your SQL syntax; check the manual that corresponds to your MySQL server version for the right syntax to use near 'privileages' at line 1
mysql> show privileges;
+-------------------------+---------------------------------------+-------------------------------------------------------+
| Privilege | Context | Comment |
+-------------------------+---------------------------------------+-------------------------------------------------------+
| Alter | Tables | To alter the table |
| Alter routine | Functions,Procedures | To alter or drop stored functions/procedures |
| Create | Databases,Tables,Indexes | To create new databases and tables |
| Create routine | Databases | To use CREATE FUNCTION/PROCEDURE |
| Create temporary tables | Databases | To use CREATE TEMPORARY TABLE |
| Create view | Tables | To create new views |
| Create user | Server Admin | To create new users |
| Delete | Tables | To delete existing rows |
| Drop | Databases,Tables | To drop databases, tables, and views |
| Event | Server Admin | To create, alter, drop and execute events |
| Execute | Functions,Procedures | To execute stored routines |
| File | File access on server | To read and write files on the server |
| Grant option | Databases,Tables,Functions,Procedures | To give to other users those privileges you possess |
| Index | Tables | To create or drop indexes |
| Insert | Tables | To insert data into tables |
| Lock tables | Databases | To use LOCK TABLES (together with SELECT privilege) |
| Process | Server Admin | To view the plain text of currently executing queries |
| Proxy | Server Admin | To make proxy user possible |
| References | Databases,Tables | To have references on tables |
| Reload | Server Admin | To reload or refresh tables, logs and privileges |
| Replication client | Server Admin | To ask where the slave or master servers are |
| Replication slave | Server Admin | To read binary log events from the master |
| Select | Tables | To retrieve rows from table |
| Show databases | Server Admin | To see all databases with SHOW DATABASES |
| Show view | Tables | To see views with SHOW CREATE VIEW |
| Shutdown | Server Admin | To shut down the server |
| Super | Server Admin | To use KILL thread, SET GLOBAL, CHANGE MASTER, etc. |
| Trigger | Tables | To use triggers |
| Create tablespace | Server Admin | To create/alter/drop tablespaces |
| Update | Tables | To update existing rows |
| Usage | Server Admin | No privileges - allow connect only |
+-------------------------+---------------------------------------+-------------------------------------------------------+
31 rows in set (0.00 sec)

特殊的权限ALL权限 : 以上所有权限除了grant option
SELECT,INSERT, UPDATE, DELETE, CREATE, DROP, RELOAD, SHUTDOWN,
PROCESS, FILE, REFERENCES, INDEX, ALTER, SHOW DATABASES, SUPER,
CREATE TEMPORARY TABLES, LOCK TABLES, EXECUTE, REPLICATION SLAVE,
REPLICATION CLIENT, CREATE VIEW, SHOW VIEW, CREATE ROUTINE,
ALTER ROUTINE, CREATE USER, EVENT, TRIGGER, CREATE TABLESPACE
一般是普通管理员具备ALL,其它普通用户按需提供相应权限,一般DROP种类的权限不会给普通用户。
with grant option:超级管理员才具备的,给别的用户授权的权限
Usage:只具备登陆权限,没有其它任何权限
同时具备ALL和with grant option就是超级管理员
—2.3 权限的管理
Linux权限是属于文件的。
MySQL权限是属于用户的属性。
——2.3.1 权限查询
show grants for app@'10.0.0.%';
——2.3.2 授权
grant 权限 on 作用范围 to 用户 identified by '123';
grant all on wordpress.* to wordpress@'10.0.0.%' identified by '123';

grant为命令
all 权限
on在什么对象上设置权限
wordpress.*权限的作用范围(对wordpress库做操作)
to对哪个用户做操作
wordpress@'10.0.0.%'用户
identified by '123'设置密码

权限作用范围设置方式:
*.*  全局范围   相当于Linux里的chmod -R /
wordpress.* 单库范围  相当于Linux里的chmod -R /wordpress
wordpress.t1 单表范围   相当于Linux里的chmod -R /wordpress/a.txt

管理员用户授权(授权过程自动创建这个用户):
grant all on *.* to oldboy@'10.0.0.%' identified by '123';
普通用户授权:
grant select,update,delete,insert on test.* to test@'10.0.0.%' identified by '123';
——2.3.3 回收权限
不能通过重复授权修改权限,因为授权都是相加的关系
revoke delete on app.* from app@'10.0.0.%';
—2.4 开发及应用人员用户授权流程
1.需要用到哪些权限
2.对哪个库哪个表操作
3.你从哪个地址链接数据库
4.密码要求
—2.5 mysql8.0在用户、权限管理方面的变化
建用户和授权分开了
grant 不再支持自动创建用户了,不支持改密码
授权之前,必须要提前创建用户。

a.必须先建好用户,再授权,grant 命令不再支持自动建用户,不支持设置密码。
>create user oldgirl@'10.0.0.%' identified by '123';
>grant all on oldgirl.* to oldgirl@'10.0.0.%';

b.建用户,密码加密插件发生变化为 :caching_sha2_password,有很多场景需要修改为: mysql_native_password
比如: 第三方工具、主从、高可用、备份软件等。。。
mysql> alter user oldboy@'10.0.0.%' identified with mysql_native_password by '123';

c. 8.0 加入了role(角色)的概念。就是权限的组合。
3.MySQL连接管理
—3.1 客户端命令
mysql 命令的使用
[root@db01 ~]# which mysql
/data/app/mysql/bin/mysql

-u 用户
-p 密码
-h IP
-P 端口
-S socket文件
-e 免交互执行命令
< 导入SQL脚本
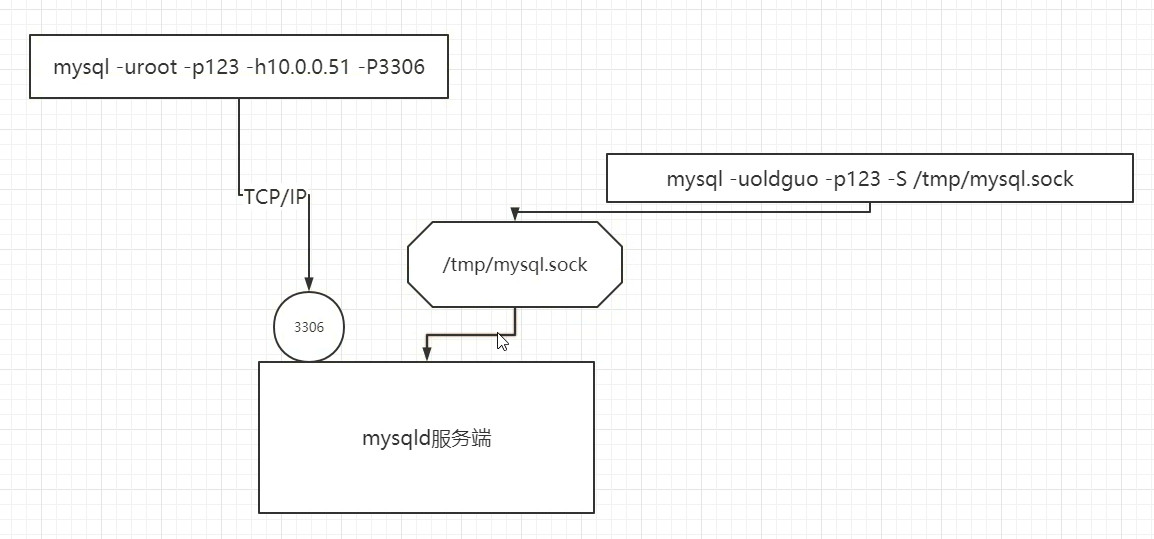
——3.1.1 Socket连接方式
mysql -uroot -p -S /tmp/mysql.sock 等于 mysql -uroot -p

前提条件:
1.设置正确的Socket文件位置
2.提前创建好白名单为localhost相关用户
3.配置文件已告知路径,为 -S /tmp/mysql.sock,前面可省略
——3.1.2 TCP/IP连接
Linux:ssh root@10.0.0.51 22
mysql: mysql -uoldguo -p123 -h10.0.0.51 -P3306

前提:
a.IP和端口是正确的
b.提前创建好可以远程登录的用户。
c.-P和-h必须一起使用
—2.1 作用
控制用户能够对数据库对象做哪些操作
—2.2 定义方式
Linux权限:r w x mysql权限:命令即权限 查看权限列表: mysql> show privileages; ERROR 1064 (42000): You have an error in your SQL syntax; check the manual that corresponds to your MySQL server version for the right syntax to use near 'privileages' at line 1 mysql> show privileges; +-------------------------+---------------------------------------+-------------------------------------------------------+ | Privilege | Context | Comment | +-------------------------+---------------------------------------+-------------------------------------------------------+ | Alter | Tables | To alter the table | | Alter routine | Functions,Procedures | To alter or drop stored functions/procedures | | Create | Databases,Tables,Indexes | To create new databases and tables | | Create routine | Databases | To use CREATE FUNCTION/PROCEDURE | | Create temporary tables | Databases | To use CREATE TEMPORARY TABLE | | Create view | Tables | To create new views | | Create user | Server Admin | To create new users | | Delete | Tables | To delete existing rows | | Drop | Databases,Tables | To drop databases, tables, and views | | Event | Server Admin | To create, alter, drop and execute events | | Execute | Functions,Procedures | To execute stored routines | | File | File access on server | To read and write files on the server | | Grant option | Databases,Tables,Functions,Procedures | To give to other users those privileges you possess | | Index | Tables | To create or drop indexes | | Insert | Tables | To insert data into tables | | Lock tables | Databases | To use LOCK TABLES (together with SELECT privilege) | | Process | Server Admin | To view the plain text of currently executing queries | | Proxy | Server Admin | To make proxy user possible | | References | Databases,Tables | To have references on tables | | Reload | Server Admin | To reload or refresh tables, logs and privileges | | Replication client | Server Admin | To ask where the slave or master servers are | | Replication slave | Server Admin | To read binary log events from the master | | Select | Tables | To retrieve rows from table | | Show databases | Server Admin | To see all databases with SHOW DATABASES | | Show view | Tables | To see views with SHOW CREATE VIEW | | Shutdown | Server Admin | To shut down the server | | Super | Server Admin | To use KILL thread, SET GLOBAL, CHANGE MASTER, etc. | | Trigger | Tables | To use triggers | | Create tablespace | Server Admin | To create/alter/drop tablespaces | | Update | Tables | To update existing rows | | Usage | Server Admin | No privileges - allow connect only | +-------------------------+---------------------------------------+-------------------------------------------------------+ 31 rows in set (0.00 sec) 特殊的权限ALL权限 : 以上所有权限除了grant option SELECT,INSERT, UPDATE, DELETE, CREATE, DROP, RELOAD, SHUTDOWN, PROCESS, FILE, REFERENCES, INDEX, ALTER, SHOW DATABASES, SUPER, CREATE TEMPORARY TABLES, LOCK TABLES, EXECUTE, REPLICATION SLAVE, REPLICATION CLIENT, CREATE VIEW, SHOW VIEW, CREATE ROUTINE, ALTER ROUTINE, CREATE USER, EVENT, TRIGGER, CREATE TABLESPACE 一般是普通管理员具备ALL,其它普通用户按需提供相应权限,一般DROP种类的权限不会给普通用户。 with grant option:超级管理员才具备的,给别的用户授权的权限 Usage:只具备登陆权限,没有其它任何权限 同时具备ALL和with grant option就是超级管理员
—2.3 权限的管理
Linux权限是属于文件的。 MySQL权限是属于用户的属性。
——2.3.1 权限查询
show grants for app@'10.0.0.%';
——2.3.2 授权
grant 权限 on 作用范围 to 用户 identified by '123';
grant all on wordpress.* to wordpress@'10.0.0.%' identified by '123';
grant为命令
all 权限
on在什么对象上设置权限
wordpress.*权限的作用范围(对wordpress库做操作)
to对哪个用户做操作
wordpress@'10.0.0.%'用户
identified by '123'设置密码
权限作用范围设置方式:
*.* 全局范围 相当于Linux里的chmod -R /
wordpress.* 单库范围 相当于Linux里的chmod -R /wordpress
wordpress.t1 单表范围 相当于Linux里的chmod -R /wordpress/a.txt
管理员用户授权(授权过程自动创建这个用户):
grant all on *.* to oldboy@'10.0.0.%' identified by '123';
普通用户授权:
grant select,update,delete,insert on test.* to test@'10.0.0.%' identified by '123';
——2.3.3 回收权限
不能通过重复授权修改权限,因为授权都是相加的关系
revoke delete on app.* from app@'10.0.0.%';
—2.4 开发及应用人员用户授权流程
1.需要用到哪些权限
2.对哪个库哪个表操作
3.你从哪个地址链接数据库
4.密码要求
—2.5 mysql8.0在用户、权限管理方面的变化
建用户和授权分开了
grant 不再支持自动创建用户了,不支持改密码
授权之前,必须要提前创建用户。
a.必须先建好用户,再授权,grant 命令不再支持自动建用户,不支持设置密码。
>create user oldgirl@'10.0.0.%' identified by '123';
>grant all on oldgirl.* to oldgirl@'10.0.0.%';
b.建用户,密码加密插件发生变化为 :caching_sha2_password,有很多场景需要修改为: mysql_native_password
比如: 第三方工具、主从、高可用、备份软件等。。。
mysql> alter user oldboy@'10.0.0.%' identified with mysql_native_password by '123';
c. 8.0 加入了role(角色)的概念。就是权限的组合。
3.MySQL连接管理
—3.1 客户端命令
mysql 命令的使用
[root@db01 ~]# which mysql
/data/app/mysql/bin/mysql
-u 用户
-p 密码
-h IP
-P 端口
-S socket文件
-e 免交互执行命令
< 导入SQL脚本
——3.1.1 Socket连接方式
mysql -uroot -p -S /tmp/mysql.sock 等于 mysql -uroot -p
前提条件:
1.设置正确的Socket文件位置
2.提前创建好白名单为localhost相关用户
3.配置文件已告知路径,为 -S /tmp/mysql.sock,前面可省略
——3.1.2 TCP/IP连接
Linux:ssh root@10.0.0.51 22
mysql: mysql -uoldguo -p123 -h10.0.0.51 -P3306
前提:
a.IP和端口是正确的
b.提前创建好可以远程登录的用户。
c.-P和-h必须一起使用
grant 权限 on 作用范围 to 用户 identified by '123'; grant all on wordpress.* to wordpress@'10.0.0.%' identified by '123'; grant为命令 all 权限 on在什么对象上设置权限 wordpress.*权限的作用范围(对wordpress库做操作) to对哪个用户做操作 wordpress@'10.0.0.%'用户 identified by '123'设置密码 权限作用范围设置方式: *.* 全局范围 相当于Linux里的chmod -R / wordpress.* 单库范围 相当于Linux里的chmod -R /wordpress wordpress.t1 单表范围 相当于Linux里的chmod -R /wordpress/a.txt 管理员用户授权(授权过程自动创建这个用户): grant all on *.* to oldboy@'10.0.0.%' identified by '123'; 普通用户授权: grant select,update,delete,insert on test.* to test@'10.0.0.%' identified by '123';
——2.3.3 回收权限
不能通过重复授权修改权限,因为授权都是相加的关系
revoke delete on app.* from app@'10.0.0.%';
—2.4 开发及应用人员用户授权流程
1.需要用到哪些权限
2.对哪个库哪个表操作
3.你从哪个地址链接数据库
4.密码要求
—2.5 mysql8.0在用户、权限管理方面的变化
建用户和授权分开了
grant 不再支持自动创建用户了,不支持改密码
授权之前,必须要提前创建用户。
a.必须先建好用户,再授权,grant 命令不再支持自动建用户,不支持设置密码。
>create user oldgirl@'10.0.0.%' identified by '123';
>grant all on oldgirl.* to oldgirl@'10.0.0.%';
b.建用户,密码加密插件发生变化为 :caching_sha2_password,有很多场景需要修改为: mysql_native_password
比如: 第三方工具、主从、高可用、备份软件等。。。
mysql> alter user oldboy@'10.0.0.%' identified with mysql_native_password by '123';
c. 8.0 加入了role(角色)的概念。就是权限的组合。
3.MySQL连接管理
—3.1 客户端命令
mysql 命令的使用
[root@db01 ~]# which mysql
/data/app/mysql/bin/mysql
-u 用户
-p 密码
-h IP
-P 端口
-S socket文件
-e 免交互执行命令
< 导入SQL脚本
——3.1.1 Socket连接方式
mysql -uroot -p -S /tmp/mysql.sock 等于 mysql -uroot -p
前提条件:
1.设置正确的Socket文件位置
2.提前创建好白名单为localhost相关用户
3.配置文件已告知路径,为 -S /tmp/mysql.sock,前面可省略
——3.1.2 TCP/IP连接
Linux:ssh root@10.0.0.51 22
mysql: mysql -uoldguo -p123 -h10.0.0.51 -P3306
前提:
a.IP和端口是正确的
b.提前创建好可以远程登录的用户。
c.-P和-h必须一起使用
—3.1 客户端命令
mysql 命令的使用 [root@db01 ~]# which mysql /data/app/mysql/bin/mysql -u 用户 -p 密码 -h IP -P 端口 -S socket文件 -e 免交互执行命令 < 导入SQL脚本
——3.1.1 Socket连接方式
mysql -uroot -p -S /tmp/mysql.sock 等于 mysql -uroot -p
前提条件:
1.设置正确的Socket文件位置
2.提前创建好白名单为localhost相关用户
3.配置文件已告知路径,为 -S /tmp/mysql.sock,前面可省略
——3.1.2 TCP/IP连接
Linux:ssh root@10.0.0.51 22
mysql: mysql -uoldguo -p123 -h10.0.0.51 -P3306
前提:
a.IP和端口是正确的
b.提前创建好可以远程登录的用户。
c.-P和-h必须一起使用
Linux:ssh root@10.0.0.51 22
mysql: mysql -uoldguo -p123 -h10.0.0.51 -P3306
前提:
a.IP和端口是正确的
b.提前创建好可以远程登录的用户。
c.-P和-h必须一起使用
—3.2 开发工具
sqlyog,navicat,workbench,api
4.初始化配置文件
—4.1 作用
a.影响到数据库的启动、日常工作
b.影响到客户端连接(本地服务器发起的)
—4.2 文件格式
——4.2.1 语法
[标签项]:用来表示不同的程序
配置项=xxxx  设置的参数键值对

标签类型:服务端、客户端
服务器端标签:
[mysqld]
[mysqld_safe]
[server] ——服务端的一个统称,不建议使用

客户端标签:
[mysql]  ——连接mysql服务器
[mysqldump] ——备份
[client]   ——客户端对的一个统称,不建议使用
——4.2.2 配置文件的示例
[root@db01 ~]# cat /etc/my.cnf
[mysqld]
user=mysql ——mysql数据库管理用户
basedir=/app/mysql ——程序路径
datadir=/data/mysql ——数据路径
socket=/tmp/mysql.sock ——socket文件位置,服务器启动后生成文件
server_id=6 ——主从复制要用到,必加参数(1-65535)
port=3306 ——默认端口号
log_error=/data/mysql/mysql.log ——错误日志文件

[mysql]
socket=/tmp/mysql.sock
prompt=Master [\\d]>  ——前面为自定义显示内容,后面为显示所在数据库路径信息
——4.2.3 配置文件读取顺序
[root@db01 ~]#  mysqld --help --verbose |grep my.cnf
/etc/my.cnf -> /etc/mysql/my.cnf -> /usr/local/mysql/etc/my.cnf -> ~/.my.cnf
注:
每个数据库保留一个配置文件
默认情况下,MySQL启动时,会依次读取以上配置文件,如果有重复选项,会以最后一个文件设置的为准。
但是,如果启动时加入了--defaults-file=xxxx时,以上的所有文件都不会读取.
mysqld --defaults-file=/opt/my1.cnf &
mysqld_safe --defaults-file=/opt/my2.cnf &(常用)
—4.3 MySQL本地管理员用户密码忘记
a.停数据库/etc/init.d/mysqld stop

b.启动数据库到安全模式
[root@db01 ~]# mysqld_safe --skip-grant-tables --skip-networking &
参数作用:
 mysqld_safe  ——mysql安全启动方式,用于维护
--skip-grant-tables  ——跳过授权表,不开启验证功能
--skip-networking   ——阻止所有的网络连接
&  ——表示后台调用

c.改密码
mysql> flush privileges; 把磁盘上的授权表刷到内存
mysql> alter user root@'localhost' identified by '123456';

d.重启至正常模式
[root@db01 ~]# pkill mysqld
[root@db01 ~]# systemctl start mysqld
5. mysql的启动关闭
[标签项]:用来表示不同的程序
配置项=xxxx 设置的参数键值对
标签类型:服务端、客户端
服务器端标签:
[mysqld]
[mysqld_safe]
[server] ——服务端的一个统称,不建议使用
客户端标签:
[mysql] ——连接mysql服务器
[mysqldump] ——备份
[client] ——客户端对的一个统称,不建议使用
——4.2.2 配置文件的示例
[root@db01 ~]# cat /etc/my.cnf
[mysqld]
user=mysql ——mysql数据库管理用户
basedir=/app/mysql ——程序路径
datadir=/data/mysql ——数据路径
socket=/tmp/mysql.sock ——socket文件位置,服务器启动后生成文件
server_id=6 ——主从复制要用到,必加参数(1-65535)
port=3306 ——默认端口号
log_error=/data/mysql/mysql.log ——错误日志文件
[mysql]
socket=/tmp/mysql.sock
prompt=Master [\\d]> ——前面为自定义显示内容,后面为显示所在数据库路径信息
——4.2.3 配置文件读取顺序
[root@db01 ~]# mysqld --help --verbose |grep my.cnf
/etc/my.cnf -> /etc/mysql/my.cnf -> /usr/local/mysql/etc/my.cnf -> ~/.my.cnf
注:
每个数据库保留一个配置文件
默认情况下,MySQL启动时,会依次读取以上配置文件,如果有重复选项,会以最后一个文件设置的为准。
但是,如果启动时加入了--defaults-file=xxxx时,以上的所有文件都不会读取.
mysqld --defaults-file=/opt/my1.cnf &
mysqld_safe --defaults-file=/opt/my2.cnf &(常用)
—4.3 MySQL本地管理员用户密码忘记
a.停数据库/etc/init.d/mysqld stop
b.启动数据库到安全模式
[root@db01 ~]# mysqld_safe --skip-grant-tables --skip-networking &
参数作用:
mysqld_safe ——mysql安全启动方式,用于维护
--skip-grant-tables ——跳过授权表,不开启验证功能
--skip-networking ——阻止所有的网络连接
& ——表示后台调用
c.改密码
mysql> flush privileges; 把磁盘上的授权表刷到内存
mysql> alter user root@'localhost' identified by '123456';
d.重启至正常模式
[root@db01 ~]# pkill mysqld
[root@db01 ~]# systemctl start mysqld
5. mysql的启动关闭
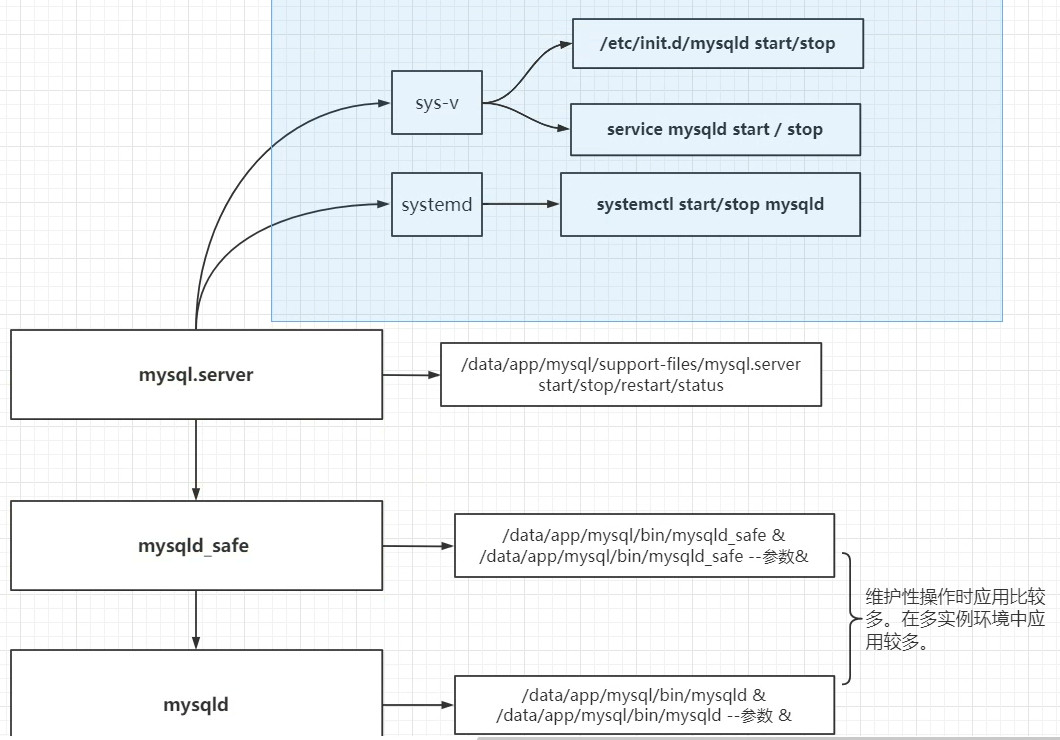
以上多种方式,都可以单独启动MySQL服务
mysqld_safe和mysqld一般是在临时维护时使用。启动过程中不产生日志,启动失败时用mysqld。
从Centos 7系统开始,支持systemd直接调用mysqld的方式进行启动数据库

自带启动脚本:
mysql_safe --defaults-file=/opt/my.cnf &
mysqld_safe --skip-grant-tables --skip-networking &

其它关闭数据库方式:
[root@db01 ~]# mysqladmin -uroot -p123 shutdown
mysql > shutdown
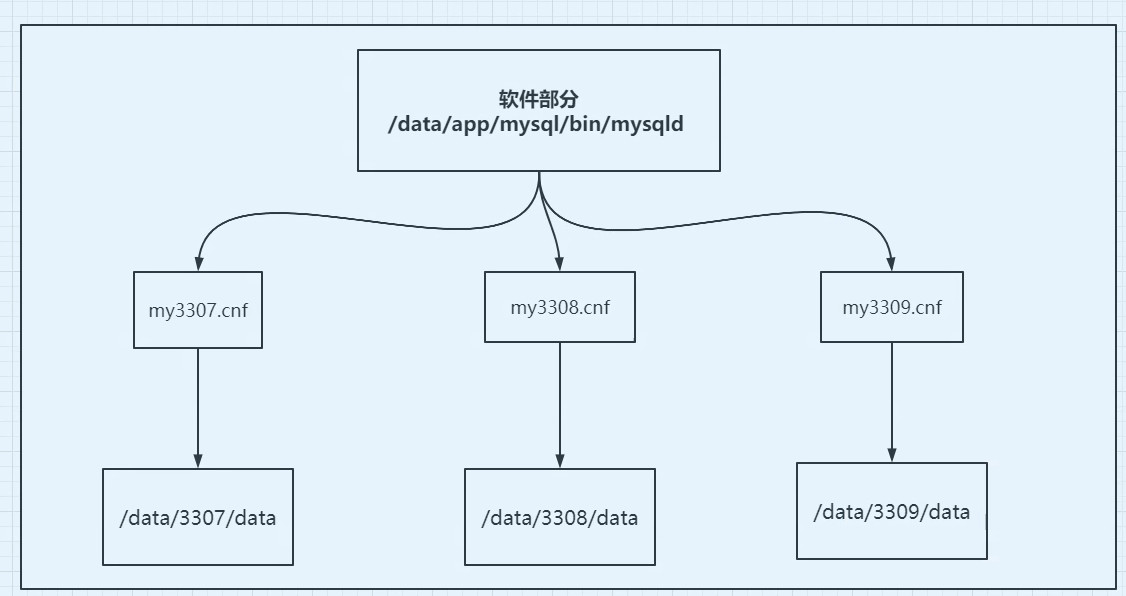
6.多实例的应用