- 1 介绍
- —1.1 安装流程
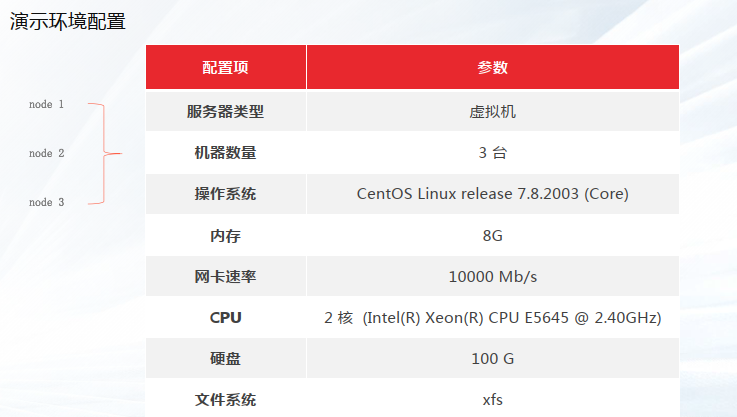
- —1.2 配置要求
- —1.3 集群规划
- 2 环境准备
- —2.1 节点软硬件配置
- —2.2 集群服务配置(三个节点)
- —2.3 确保集群每个节点的防火墙关闭
- —2.4 确保每个节点的 SELINUX 关闭
- —2.5 三个节点重新设置主机名
- —2.6 配置三个节点的 IP 主机名映射
- —2.7 检查软件依赖
- — 2.8 检查是否支持 rdtscp指令集
- 3 集群安装
- —3.1 每个节点都要创建 DBA 用户
- —3.2 添加gbase 用户至sudoer 列表
- —3.3 配置gbase用户ssh互信
- —3.4 配置系统时间同步
- —3.5 使用 SSH 工具上传安装包
- —3.6 解压安装包
- —3.7 开始安装
- ——3.7.1 编辑集群部署文件 gbase8c.yml
- ——3.7.2 执行安装脚本
- ——3.7.3 节点状态检查
- 4 数据库启停
- 5 卸载
- 6 连接和 SQL 测试
- 7 常见问题
- —7.1 NTP服务未处于正常运行状态
- —7.2 安装数据库时报错显示错误码:80000201:Run cmd failed:%s
- —7.3 安装过程中,报错显示80000301:Transport endpoint unreach
- —7.4 缺失依赖文件
- —7.5 系统参数问题
- —7.6 安装报错:Failed to start instance. Error: Please check the gs_ctl log for failure details.
- —7.7 安装:Failed to initialize instance
- —7.8 安装:两个节点成功,一个节点失败
- —7.9 安装:端口被占用
- —7.10 安装: "The content of file /home/gbase/version.cfg is not correct
- —7.11 安装:包的版本号和 gbase.yml 的 version 不一致
- —7.12 80000201 Resource:gbase already in use
- —7.13 安装:80000107 Resource:gbase already in use
- —7.14 安装:80000116 Rpc request failed:Coordinator cnl start failed'
- —7.15 安装:80000116 Rpc request failed:Rpc request failed:Start pg failed
- —7.16 安装:80000116 Rpc request failed:Can not find gtm master, prestart all nodes failed
- —7.17 安装:su - gbase bash: /home/gbase/.bash profile: 权限不够
- —7.18 安装:su gbase 后,home/gbase/.bashrc:权限不够
- —7.19 安装:The current 0S rhel is not supported.
- —7.20 执行 bash: gsql: 未找到命令
- —7.21 执行:Failed to connect /home/gbase/gbase_db/tmp:5432
- —7.22 执行:ERROR: Installation node group is not defined in current cluster
1 介绍
—1.1 安装流程
GBase 8c 是 GBASE公司(天津南大通用数据技术股份有限公司)自主研发的一款多模多态的企业级分布式数据库:支持行存、列存、内存等多种存储模式;支持单机、主备式、分布式等多种部署形态。
GBase 8c 具备高性能、高可用、弹性伸缩、高安全性等特性,可以部署在物理机、虚拟机、容器、私有云和公有云,为关键行业核心系统、互联网业务系统和政企业务系统提供安全、稳定、可靠的数据存储和管理服务。
本文讲解集群版安装部署步骤、卸载、连接测试。属于入门级别的实操课程。


—1.2 配置要求
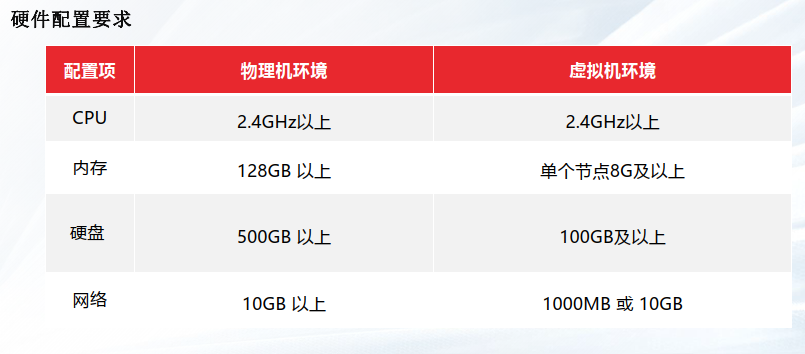
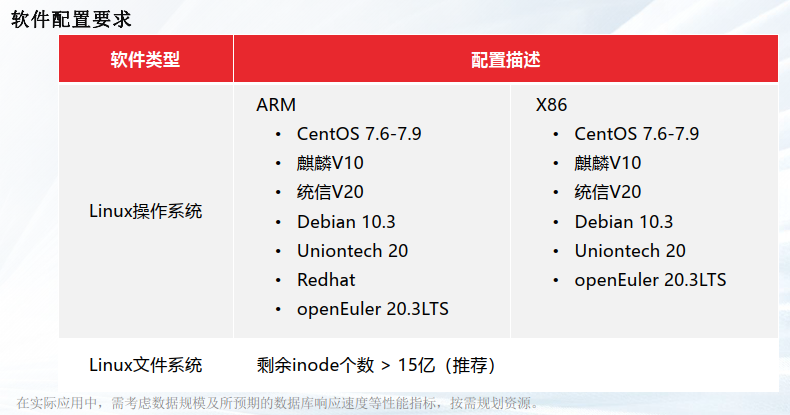
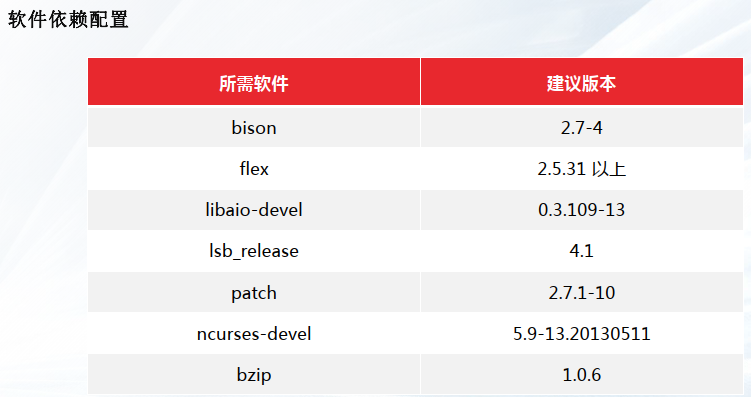
—1.3 集群规划
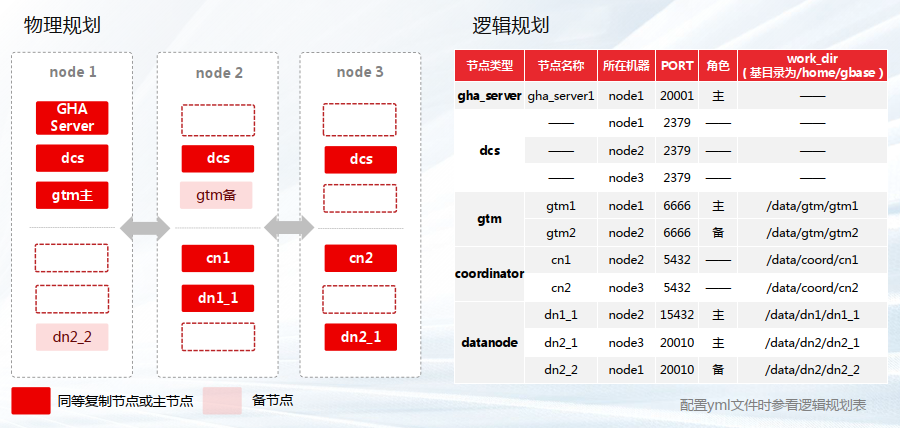
2 环境准备
—2.1 节点软硬件配置
☆ 针对内存 4G 的节点,需要增加 8G SWAP 才能安装成功。具体步骤:
① 创建 8G 的 Swap 文件
# dd if=/dev/zero of=/etc/swapfile bs=1024 count=8192000
② 制作为 Swap 文件
# mkswap /etc/swapfile
③ 令 Swap 文件生效
# swapon /etc/swapfile
④ 查看当前SWAP
# swapon -s
文件名				类型		大小	已用	权限
/dev/dm-1                              	partition	1048572	59840	-2
/etc/swapfile                          	file	8191996	3148	-3
⑤ 自动挂载
编辑/etc/fstab,将以下行追加到文件末尾
/etc/swapfile swap swap defaults 0 0
⑥ 查看创建好的 SWAP,已经增长了 8G
# free -m
              total        used        free      shared  buff/cache   available
Mem:           3770        1660         117        1740        1992         138
Swap:          9023          61        8962

⑦提前检查下端口,避免安装的时候冲突。
------- 常用的默认端口 20001、2379、6666、5432、15432、20010等
netstat -ntlp
—2.2 集群服务配置(三个节点)
node1(10.0.0.15)  GHA Server(高可用服务)、DCS(分布式配置存储)、GTM主(全局事务管理),DN2备
node2(10.0.0.16)  DCS、GTM备、CN1(协调器)、DN1主
node3(10.0.0.17) DCS、CN2、DN2主
—2.3 确保集群每个节点的防火墙关闭
(1) 检查每个节点的防火墙状态
# systemctl status firewalld.service
如果系统提示以下信息说明防火墙已被禁用
● firewalld.service - firewalld - dynamic firewall daemon
Loaded: loaded (/usr/lib/systemd/system/firewalld.service; disabled; vendor preset:enabled)
Active: inactive (dead)
Docs: man:firewalld(1)
(2) 如果防火墙没有关闭,则执行
# systemctl stop firewalld.service
# systemctl disable firewalld.service
以上两条命令关闭防火墙并禁止防火墙开机自启动。
—2.4 确保每个节点的 SELINUX 关闭
(1) 检查每个节点的 SELINUX 状态
# sestatus
如果系统提示以下信息说明 selinux 已被禁用
SELinux status: disabled
(2) 如果 SELINUX 没有关闭,需要编辑当前节点的 selinux 配置文件
# vi /etc/selinux/config
SELINUX=enforcing
将 SELINUX 关键字的值修改为 disabled,存盘退出,执行
# shutdown -r
重启操作系统。
—2.5 三个节点重新设置主机名
[root@gbase05 ~]# hostnamectl set-hostname gbase8c_1
[root@gbase06 ~]# hostnamectl set-hostname gbase8c_2
[root@gbase07 ~]# hostnamectl set-hostname gbase8c_3
—2.6 配置三个节点的 IP 主机名映射
编辑三个节点的 hosts 文件
# vi /etc/hosts
将以下三行信息追加到 hosts 文件中
10.0.0.15 gbase8c_1
10.0.0.16 gbase8c_2
10.0.0.17 gbase8c_3
—2.7 检查软件依赖
检查每个节点bison、flex、patch、bzip2 依赖是否安装:rpm -q bison flex patch bzip2

— 2.8 检查是否支持 rdtscp指令集
cat /proc/cpuinfo | grep rdtscp
• 显示以下信息,表示支持rdtscp指令集。

• 若不支持,请参考对应CPU型号官网资料,安装rdtscp指令集。
3 集群安装
—3.1 每个节点都要创建 DBA 用户
# useradd gbase
# passwd gbase
—3.2 添加gbase 用户至sudoer 列表
三个节点都要执行如下操作——
# visudo
打开 sudoer 配置文件,找到 “root ALL=(ALL) ALL” 行,在下方增加
“gbase ALL=(ALL) NOPASSWD:ALL”
## Allow root to run any commands anywhere
root ALL=(ALL) ALL
gbase ALL=(ALL) NOPASSWD:ALL
完成 sudoer 配置后,数据库安装就可以用 gbase 用户了。本文使用的安装包是不能在 root 账户下安装的。
个别操作系统,经过以上的设置后,gbase 用户执行 sudo 命令时,第一次还是有密码提示。需要有以下补救措施:
(1) root 账户下进入 /etc/sudoers.d/ 目录
# cd /etc/sudoers.d/
(2) 生成新文件 gbase:
# vi gbase
添加如下信息后,存盘即可:
gbase ALL=(ALL) NOPASSWD:ALL
—3.3 配置gbase用户ssh互信
每个节点都要执行以下命令——
(1) 切换到 gbase 用户下
# su - gbase
(2) 创建秘钥目录和必要的授权
$ mkdir ~/.ssh
$ chmod 700 ~/.ssh
(3) 生成秘钥文件(连续回车即可)
$ ssh-keygen -t rsa
(4) 将公钥文件上传至其他节点即可实现免密登录:
此操作需输入 gbase 的密码,所有节点都要执行——
$ ssh-copy-id gbase@10.0.0.15
$ ssh-copy-id gbase@10.0.0.16
$ ssh-copy-id gbase@10.0.0.17
$ echo 'StrictHostKeyChecking no' >> ~/.ssh/config;
$ echo 'UserKnownHostsFile ~/.ssh/known_hosts' >> ~/.ssh/config;
$ chmod 644 ~/.ssh/config
不需要输入密码即可登录,表明配置互信成功。
—3.4 配置系统时间同步
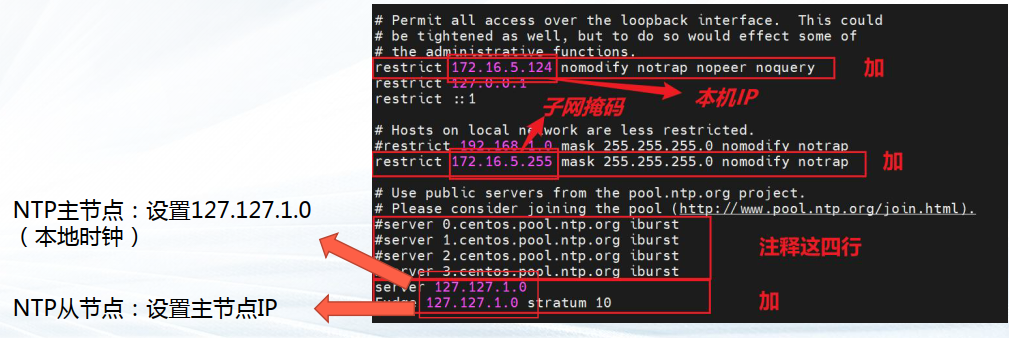
(1) 检查所有服务器上 NTP 服务的状态:sudo systemctl status ntpd.service
(2) 主安装节点(10.0.0.15)作为 server执行# vim /etc/ntp.conf
打开 NTP 服务配置文件,修改如下:
# Permit all access over the loopback interface.  This could
# be tightened as well, but to do so would effect some of
# the administrative functions.
restrict 10.0.0.15 nomodify notrap nopeer noquery
restrict 127.0.0.1
restrict ::1

# Hosts on local network are less restricted.
restrict 10.0.0.255 mask 255.255.255.0 nomodify notrap

# Use public servers from the pool.ntp.org project.
# Please consider joining the pool (http://www.pool.ntp.org/join.html).
#server 0.centos.pool.ntp.org iburst
#server 1.centos.pool.ntp.org iburst
#server 2.centos.pool.ntp.org iburst
#server 3.centos.pool.ntp.org iburst
server 127.127.1.0
Fudge 127.127.1.0 stratum 10
ntp.conf 文件存盘退出后,执行
$ sudo service ntpd start # 启动NTP服务
$ sudo chkconfig ntpd on # 设置 NTP 服务开机自启
(3) 修改数据节点一(10.0.0.16)NTP 配置
执行
# vi /etc/ntp.conf
打开 NTP 服务配置文件,修改如下:
# Permit all access over the loopback interface.  This could
# be tightened as well, but to do so would effect some of
# the administrative functions.
restrict 10.0.0.16 nomodify notrap nopeer noquery
restrict 127.0.0.1
restrict ::1

# Hosts on local network are less restricted.
restrict 10.0.0.255 mask 255.255.255.0 nomodify notrap

# Use public servers from the pool.ntp.org project.
# Please consider joining the pool (http://www.pool.ntp.org/join.html).
#server 0.centos.pool.ntp.org iburst
#server 1.centos.pool.ntp.org iburst
#server 2.centos.pool.ntp.org iburst
#server 3.centos.pool.ntp.org iburst
server 10.0.0.15
Fudge 10.0.0.15 stratum 10
ntp.conf 文件存盘退出后,执行
$ sudo service ntpd start # 启动NTP服务
$ sudo chkconfig ntpd on # 设置 NTP 服务开机自启
(4) 修改数据节点二(10.0.0.17)NTP 配置
执行
# vi /etc/ntp.conf
打开 NTP 服务配置文件,修改如下:
# Permit all access over the loopback interface.  This could
# be tightened as well, but to do so would effect some of
# the administrative functions.
restrict 10.0.0.17 nomodify notrap nopeer noquery
restrict 127.0.0.1
restrict ::1

# Hosts on local network are less restricted.
restrict 10.0.0.255 mask 255.255.255.0 nomodify notrap

# Use public servers from the pool.ntp.org project.
# Please consider joining the pool (http://www.pool.ntp.org/join.html).
#server 0.centos.pool.ntp.org iburst
#server 1.centos.pool.ntp.org iburst
#server 2.centos.pool.ntp.org iburst
#server 3.centos.pool.ntp.org iburst
server 10.0.0.15
Fudge 10.0.0.15 stratum 10
ntp.conf 文件存盘退出后,执行
$ sudo service ntpd start # 启动NTP服务
$ sudo chkconfig ntpd on # 设置 NTP 服务开机自启
—3.5 使用 SSH 工具上传安装包
(GBase8cV5_S3.0.0B78_centos7.8_x86_64.tar.gz)到主安装节点(10.0.0.15) /home/gbase/gbase_package 下
—3.6 解压安装包
$ cd /home/gbase/gbase_package
$ sudo tar xvf GBase8cV5_S3.0.0B78_centos7.8_x86_64.tar.gz
解压成功新增五个文件
GBase8cV5_S3.0.0B78_CentOS_x86_64_om.sha256
GBase8cV5_S3.0.0B78_CentOS_x86_64_om.tar.gz
GBase8cV5_S3.0.0B78_CentOS_x86_64_pgpool.tar.gz
GBase8cV5_S3.0.0B78_CentOS_x86_64.sha256
GBase8cV5_S3.0.0B78_CentOS_x86_64.tar.bz2
再次解压
$ sudo tar xvf GBase8cV5_S3.0.0B78_CentOS_x86_64_om.tar.gz

—3.7 开始安装
——3.7.1 编辑集群部署文件 gbase8c.yml
[root@gbase8c_1 ~]#chown -R gbase:gbase /home/gbase
[root@gbase8c_1 gbase_package]# chown -R gbase.gbase /tmp/gha_ctl/
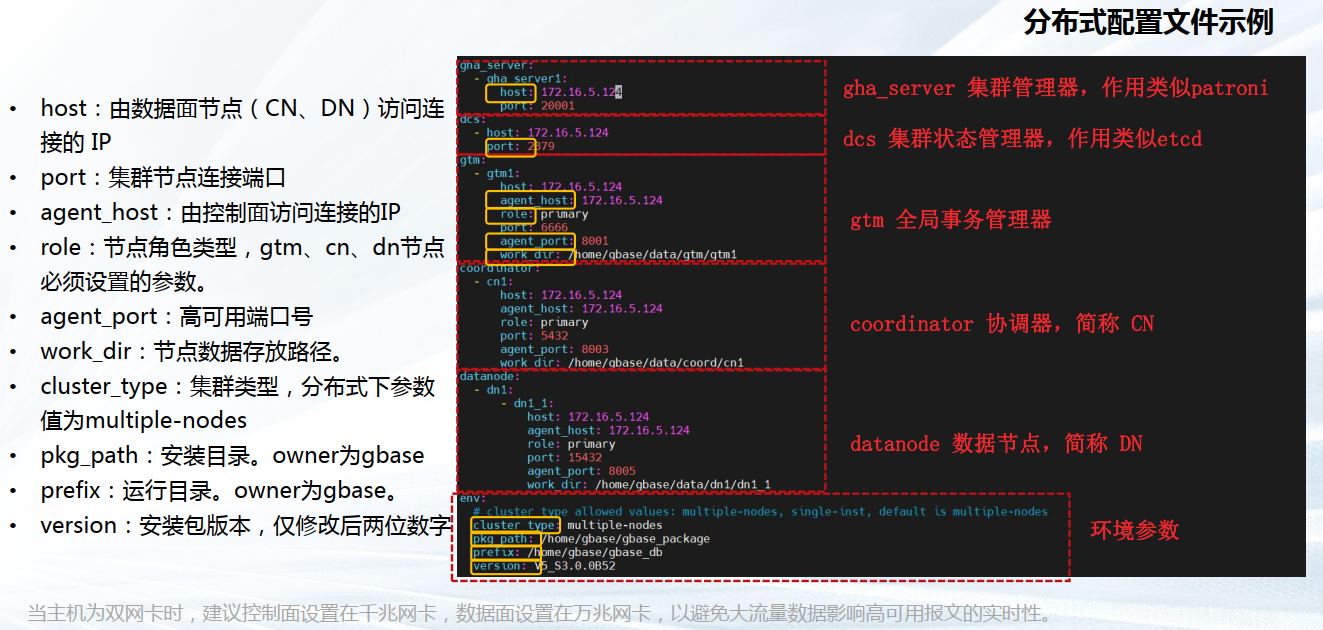
[10.0.0.15]$ vim /home/gbase/gbase_package/gbase.yml
node1(10.0.0.15)  GHA Server(高可用服务)、DCS(分布式配置存储)、GTM主(全局事务管理),DN2备
node2(10.0.0.16)  DCS、GTM备、CN1(协调器)、DN1主
node3(10.0.0.17) DCS、CN2、DN2主
=========================================================
gha_server:
  - gha_server1:
      host: 10.0.0.15
      port: 20001
dcs:
  - host: 10.0.0.15
    port: 2379
  - host: 10.0.0.16
    port: 2379
  - host: 10.0.0.17
    port: 2379
gtm:
  - gtm1:
      host: 10.0.0.15
      agent_host: 10.0.0.15
      role: primary
      port: 6666
      agent_port: 8001
      work_dir: /home/gbase/data/gtm/gtm1
  - gtm2:
      host: 100.0.0.16
      agent_host: 10.0.0.16
      role: standby
      port: 6666
      agent_port: 8002
      work_dir: /home/gbase/data/gtm/gtm2
coordinator:
  - cn1:
      host: 10.0.0.16
      agent_host: 10.0.0.16
      role: primary
      port: 5432
      agent_port: 8003
      work_dir: /home/gbase/data/coord/cn1
  - cn2:
      host: 100.0.0.17
      agent_host: 10.0.0.17
      role: primary
      port: 5432
      agent_port: 8004
      work_dir: /home/gbase/data/coord/cn2
datanode:
  - dn1:
      - dn1_1:
          host: 10.0.0.16
          agent_host: 10.0.0.16
          role: primary
          port: 15432
          agent_port: 8005
          work_dir: /home/gbase/data/dn1/dn1_1
#      - dn1_2:
#          host: 100.0.1.18
#          agent_host: 10.0.1.18
#          role: standby
#          port: 15433
#          agent_port: 8006
#          work_dir: /home/gbase/data/dn1/dn1_2
#      - dn1_3:
#          host: 100.0.1.16
#          agent_host: 10.0.1.16
#          role: standby
#          port: 15433
#          agent_port: 8006
#          work_dir: /home/gbase/data/dn1/dn1_3
  - dn2:
      - dn2_1:
          host: 10.0.0.17
          agent_host: 10.0.0.17
          role: primary
          port: 20010
          agent_port: 8007
          work_dir: /home/gbase/data/dn2/dn2_1
          # numa:
          #   cpu_node_bind: 0,1
          #   mem_node_bind: 0,1
      - dn2_2:
          host: 10.0.0.15
          agent_host: 10.0.0.15
          role: standby
          port: 20010
          agent_port: 8008
          work_dir: /home/gbase/data/dn2/dn2_2
          # numa:
          #   cpu_node_bind: 2
          #   mem_node_bind: 2
#      - dn2_3:
#          host: 100.0.1.17
#          agent_host: 10.0.1.17
#          role: standby
#          port: 20010
#          agent_port: 8009
#          work_dir: /home/gbase/data/dn2/dn2_3
          # numa:
          #   cpu_node_bind: 3
          #   mem_node_bind: 3
env:
  # cluster_type allowed values: multiple-nodes, single-inst, default is multiple-nodes
  cluster_type: multiple-nodes
  pkg_path: /home/gbase/gbase_package
  prefix: /home/gbase/gbase_db
  version: V5_S3.0.0B78
  user: gbase
  port: 22
# constant:
#   virtual_ip: 100.0.1.254/24
——3.7.2 执行安装脚本
[10.0.0.15]$ cd /home/gbase/gbase_package/script
[10.0.0.15]$ ./gha_ctl install -c gbase -p /home/gbase/gbase_package
首次安装时,环境变量尚未配置,需进入 script 目录执行 gha_ctl 命令。
A. -c 参数:数据库名称,缺省 gbase;
B. -p 参数:配置文件路径,缺省 /home/gbase。
执行时间 3+ 分钟,安装结束后,脚本会提示
{
    "ret":0,
    "msg":"Success"
}
集群安装成功!
❈ 异常处理
在没有安装开发组件的操作系统上,执行安装脚本可能出现以下现象:
{
    "ret":-1,
    "msg":"Host localhost install or upgrade dependency {'libaio': None} failed!  Host 172.168.10.227 install or upgrade dependency {'libaio': None} failed!  Host 172.168.10.108 install or upgrade dependency {'libaio': None} failed!  "
}
——解决:
在集群所有节点安装 libaio 组件
[10.0.0.15]# yum -y install libaio
[10.0.0.16]# yum -y install libaio
[10.0.0.17]# yum -y install libaio
——3.7.3 节点状态检查
在主安装节点上执行
[10.0.0.15]$ exit
[10.0.0.15]# su - gbase
以上两个命令是保证环境变量生效
gha_ctl monitor all/datanode/coordinator/gtm/dcs [-H] -l dcslist
-H 表示输出以表格形式显示。
-l 指定管理该集群的dcs信息。
dcslist 格式为http://host:2379
[10.0.0.15]$ gha_ctl monitor -l http://10.0.0.15:2379
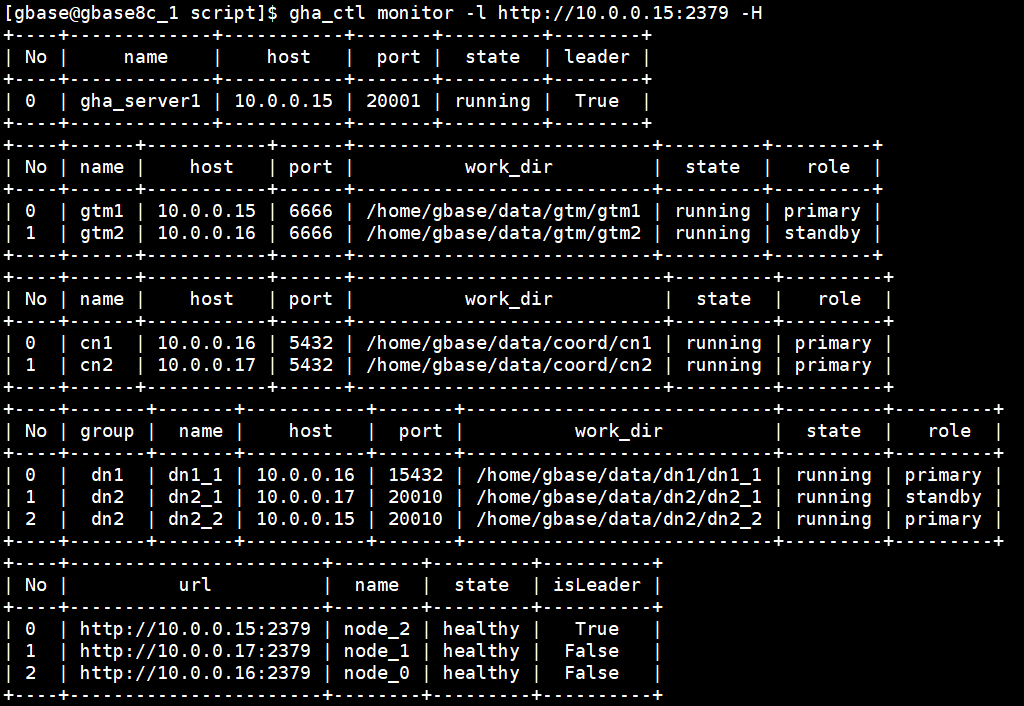
结果如下,说明集群安装正常,数据服务启动中
[gbase@gbase8c_1 script]$ gha_ctl monitor -l http://10.0.0.15:2379
{
    "cluster": "gbase",
    "version": "V5_S3.0.0B78",
    "server": [
        {
            "name": "gha_server1",
            "host": "10.0.0.15",
            "port": "20001",
            "state": "running",
            "isLeader": true
        }
    ],
    "gtm": [
        {
            "name": "gtm1",
            "host": "10.0.0.15",
            "port": "6666",
            "workDir": "/home/gbase/data/gtm/gtm1",
            "agentPort": "8001",
            "state": "running",
            "role": "primary",
            "agentHost": "10.0.0.15"
        },
        {
            "name": "gtm2",
            "host": "10.0.0.16",
            "port": "6666",
            "workDir": "/home/gbase/data/gtm/gtm2",
            "agentPort": "8002",
            "state": "running",
            "role": "standby",
            "agentHost": "10.0.0.16"
        }
    ],
    "coordinator": [
        {
            "name": "cn1",
            "host": "10.0.0.16",
            "port": "5432",
            "workDir": "/home/gbase/data/coord/cn1",
            "agentPort": "8003",
            "state": "running",
            "role": "primary",
            "agentHost": "10.0.0.16"
        },
        {
            "name": "cn2",
            "host": "10.0.0.17",
            "port": "5432",
            "workDir": "/home/gbase/data/coord/cn2",
            "agentPort": "8004",
            "state": "running",
            "role": "primary",
            "agentHost": "10.0.0.17",
            "central": true
        }
    ],
    "datanode": {
        "dn1": [
            {
                "name": "dn1_1",
                "host": "10.0.0.16",
                "port": "15432",
                "workDir": "/home/gbase/data/dn1/dn1_1",
                "agentPort": "8005",
                "state": "running",
                "role": "primary",
                "agentHost": "10.0.0.16"
            }
        ],
        "dn2": [
            {
                "name": "dn2_1",
                "host": "10.0.0.17",
                "port": "20010",
                "workDir": "/home/gbase/data/dn2/dn2_1",
                "agentPort": "8007",
                "state": "running",
                "role": "standby",
                "agentHost": "10.0.0.17"
            },
            {
                "name": "dn2_2",
                "host": "10.0.0.15",
                "port": "20010",
                "workDir": "/home/gbase/data/dn2/dn2_2",
                "agentPort": "8008",
                "state": "running",
                "role": "primary",
                "agentHost": "10.0.0.15"
            }
        ]
    },
    "dcs": {
        "clusterState": "healthy",
        "members": [
            {
                "url": "http://10.0.0.15:2379",
                "id": "4e84a5750f19d6e8",
                "name": "node_2",
                "isLeader": true,
                "state": "healthy"
            },
            {
                "url": "http://10.0.0.17:2379",
                "id": "54f0e7837cf89bc8",
                "name": "node_1",
                "isLeader": false,
                "state": "healthy"
            },
            {
                "url": "http://10.0.0.16:2379",
                "id": "b125d8f9d189f035",
                "name": "node_0",
                "isLeader": false,
                "state": "healthy"
            }
        ]
    }
}
也可以执行
[10.0.0.15]$ gha_ctl monitor -l http://10.0.0.15:2379 -H
4 数据库启停
停止数据库服务
[10.0.0.15]$ gha_ctl stop all -l http://10.0.0.15:2379
启动数据库服务
[10.0.0.15]$ gha_ctl start all -l http://10.0.0.15:2379
5 卸载
(1) 在部署机上(通常为 GTM 主节点10.0.0.15),执行 gha_ctl uninstall 命令卸载集群
语法格式:
gha_ctl uninstall -l dcslist [-c cluster]
-l 指定管理该集群的dcs信息,dcslist 格式为http://host:2379
[-c cluster]表示集群名称,为可选字段,缺省默认值gbase;
$ cd /home/gbase/gbase_package/script/
a 停止所有节点的集群服务
$ gha_ctl stop all -l http://10.0.0.15:2379
(2) 卸载DCS集群,执行 gha_ctl destroy dcs 命令。参数同上。
语法格式:
gha_ctl destroy dcs -l dcslist [-c cluster]

$ gha_ctl uninstall -l http://10.0.0.15:2379
$ cd /home/gbase/gbase_package/script
$ ./gha_ctl destroy dcs -l http://10.0.0.15:2379
6 连接和 SQL 测试
在cn节点执行
$ gsql -d postgres -p 5432
出现 postgres=# 操作符说明客户端工具 gsql 成功连接 8c 数据库
postgres=# create database testdb;
CREATE DATABASE
postgres=# create table student(ID int, Name varchar(10));
CREATE TABLE
postgres=# insert into student values(1, 'Mike'),(2,'John');
INSERT 0 2
postgres=# select * from student;
id | name
----±-----
1 | Mike
2 | John
(2 rows)
7 常见问题
—7.1 NTP服务未处于正常运行状态
解决方法:
• 若系统可以与外网通信(能ping通),执行命令与NTP服务器同步:sudo ntpdate asia.pool.ntp.org • 如果服务器所在网络无法与外网通信(无法ping通),需要检查是否已安装NTP服务。
# 确认是否已安装ntp:
[gbase@gbase8c ~]$ rpm -qa|grep ntp
#--若已安装ntp应返回如下内容:
ntp-4.2.6p5-29.el7.centos.x86_64
ntpdate-4.2.6p5-29.el7.centos.x86_64
#--若没有ntp显示,则应删除原有ntpdate后重新安装ntp:
[gbase@gbase8c ~]$ sudo yum -y remove ntpdate-4.2.6p5-29.el7.centos.x86_64 [gbase@gbase8c ~]$ sudo yum -y install ntp
—7.2 安装数据库时报错显示错误码:80000201:Run cmd failed:%s

解决方法:
• 配置 gbase 用户权限,将 gbase 用户添加至 sudoer 列表
• 以 gbase 用户身份,配置各节点间互信免密。注意 密码也需上传至本节点。
—7.3 安装过程中,报错显示80000301:Transport endpoint unreach

解决方法:
• 在备机 /etc/resolv.conf 配置文件中注释掉如下内容(红框标注),取消备机 resolv 配置,
恢复主备间时延,重新执行安装
![]()

—7.4 缺失依赖文件
安装过程中提示:无法exec:没有那个文件或目录
安装过程中提示:/home/gbase/script/../venv/bin/python3: 没有那个文件或目录 ……
解决方法
根据提示,安装依赖文件。例如:yum -y install bzip2
—7.5 系统参数问题
安装过程中可能报错显示“check install env and os setting On systemwide basis, the maximum number of SEMMNI is not correct. the current SEMMNI value is: 128. Please check it.……”
解决方法:
执行 sudo vim /etc/sysctl.conf,配置系统内核参数(红框标注,根据机器稍作修改),避免信号量 不足无法初始化。

按键“:wq!”保存并退出。并执行 sysctl -p 命令使其生效。
—7.6 安装报错:Failed to start instance. Error: Please check the gs_ctl log for failure details.

【**解决思路**】
1、sysctl kernel.shmmax 配置过小,需要修改
vi /etc/sysctl.conf
添加一行:
kernel.shmmax = 18446744073692774399
sysctl -p 生效
2、没有 lsof 命令(建议添加到软件依赖中)
yum install -y lsof
3、集群卸载后进程还在,端口占用
重启机器解决(不知是否有更好办法)
—7.7 安装:Failed to initialize instance

【解决思路】仔细检查 gbase.yml 文件。
注意:一定要注意 yml 文件格式!!两个空格为一个缩进。
YML 在线编辑(校验)器:https://www.bejson.com/validators/yaml_editor/
—7.8 安装:两个节点成功,一个节点失败

【解决思路】检查互信操作是否配置成功。
—7.9 安装:端口被占用
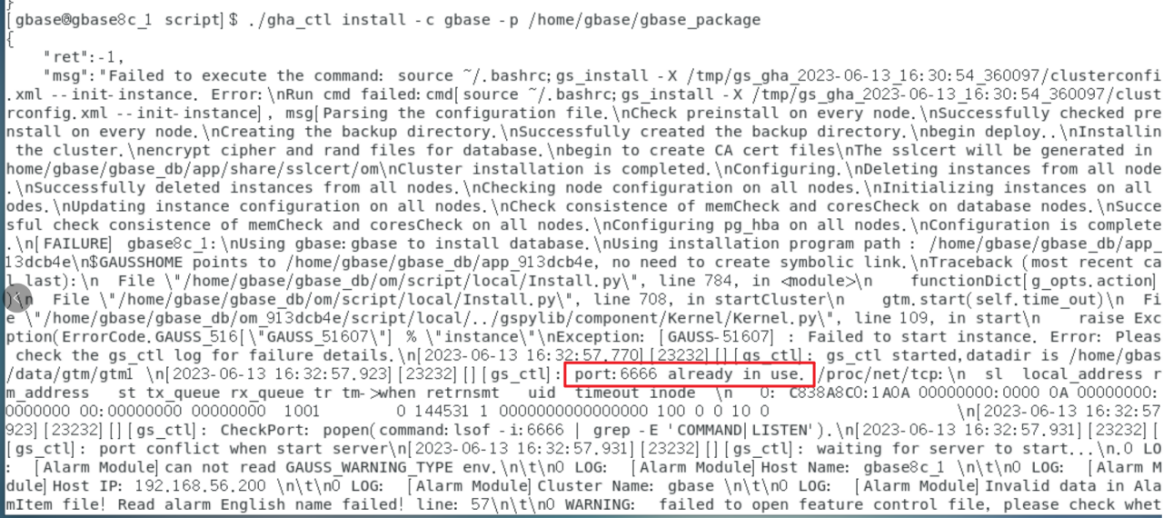
【解决思路】看看是否已被占用,例如使用命令:lsof -i:端口号
—7.10 安装: "The content of file /home/gbase/version.cfg is not correct

【解决思路】删掉再重新解压

—7.11 安装:包的版本号和 gbase.yml 的 version 不一致


【解决思路】修改 gbase.yml 中的 version 和版本包的版本号一致
—7.12 80000201 Resource:gbase already in use

【解决思路】有残留信息,没有卸载成功。
在主节点(10.168.10.70)执行以下命令——
1、停止所有节点的集群服务
$ gha_ctl stop all -l http://10.168.10.70:2379
2、集群程序的卸载:
$ gha_ctl uninstall -l http://10.168.10.70:2379
3、移除 dcs 集群:
$ cd /home/gbase/script
$ ./gha_ctl destroy dcs -l http://10.168.10.70:2379
—7.13 安装:80000107 Resource:gbase already in use

【解决思路】有残留信息,没有卸载成功。
在主节点(10.168.10.70)执行以下命令——
1、停止所有节点的集群服务
$ gha_ctl stop all -l http://10.168.10.70:2379
2、集群程序的卸载:
$ gha_ctl uninstall -l http://10.168.10.70:2379
3、移除 dcs 集群:
$ cd /home/gbase/script
$ ./gha_ctl destroy dcs -l http://10.168.10.70:2379
—7.14 安装:80000116 Rpc request failed:Coordinator cnl start failed'

【解决思路】内存不够,free -m 查看内存可用空间。
查看数据库运行日志,可能是由于存在磁盘不足,导致数据库无法启动。在这种情况下清理磁盘空间后,再次重启解决问题。
建议业务与数据库分盘部署,以防业务盘撑爆导致数据库无法启动。
—7.15 安装:80000116 Rpc request failed:Rpc request failed:Start pg failed

【解决思路】
内存不够,free -m 查看内存可用空间。
查看数据库运行日志,可能是由于存在磁盘不足,导致数据库无法启动。在这种情况下清理磁盘空间后,再次重启解决问题。
建议业务与数据库分盘部署,以防业务盘撑爆导致数据库无法启动
—7.16 安装:80000116 Rpc request failed:Can not find gtm master, prestart all nodes failed

【解决思路】内存不够,free -m 查看内存可用空间。
查看数据库运行日志,可能是由于存在磁盘不足,导致数据库无法启动。在这种情况下清理磁盘空间后,再次重启解决问题。建议业务与数据库分盘部署,以防业务盘撑爆导致数据库无法启动。
—7.17 安装:su - gbase bash: /home/gbase/.bash profile: 权限不够

【解决思路】
用 root 用户执行 chown -R gbase:gbase /home/gbase
—7.18 安装:su gbase 后,home/gbase/.bashrc:权限不够

【解决思路】要用 su - gbase 切换用户。
小贴士:su gbase 和 su - gbase 这两命令的效果:
如果加入了 符号“- ”参数,那么是一种 login-shell 的方式,意思是说切换到另一个用户 <user_name> 之后,当前的 shell 会加载 <user_name> 对应的环境变量和各种设置;相反,如果没有加符号“-”参数,那么是一种 non-login-shell 的方式,意思是说我现在切换到了 <user_name>,但是当前的 shell 还是加载切换之前的那个用户的环境变量以及各种设置。
—7.19 安装:The current 0S rhel is not supported.

【解决思路】 在 package.info 中 修改名字
—7.20 执行 bash: gsql: 未找到命令

【解决思路】
export GPHOME=/home/gbase/安装目录 >> ~/.bashrc
export PATH=$GPHOME/script:$PATH >> ~/.bashrc
source ~/.bashrc
—7.21 执行:Failed to connect /home/gbase/gbase_db/tmp:5432
问题描述:GTM 主节点上执行 gslq 连接报错。在另外 cn1 和 cn2 上就可以正常连接。

【解决思路】
连接命令格式如下:
gsql -d dbname -p port <-U user_name> <-h hostip>
-d 参数指定要连接到的数据库名称。首次连接可以指定生成的默认数据库 postgres。
-p 参数指定通过节点哪个端口号连接。可查看安装使用的 yml 文件。
-U 参数指定以哪个数据库用户身份连接,权限可能不同。缺省默认为 gbase。
-h 参数指定数据库节点所在的服务器 IP。缺省默认为当前服务器 IP非 cn 节点,要指定 ip
gsql -d postgres -p 5432 -U gbase -h 172.30.2.28
—7.22 执行:ERROR: Installation node group is not defined in current cluster

【解决思路】
这个我这是因为 visudo 的配置配错了
操作要求:打开 sudoer 配置文件,找到 “
root ALL=(ALL) ALL” 行,在下方增加
“gbase ALL=(ALL) NOPASSWD:ALL”
错误做法:我直接 shift+G 在最后把下面这段复制进去了
## Allow root to run any commands anywhere
root ALL=(ALL) ALL
gbase ALL=(ALL) NOPASSWD:ALL
 MySQL学习笔记